服务器搭建promox 并安装ubuntu 下Gitlab 服务
promox安装简述
-
如果需要修改promox 的IP地址
#查看ip地址 # 此文件为web管理界面的登录地址 cat /etc/issue #此文件为主机名的配置文件 cat /etc/hosts #此文件为主机IP地址的配置文件 cat /etc/network/interfaces #修改ip地址 vi /etc/issue vi /etc/hosts vi /etc/network/interfaces #重启接口和web管理服务 /etc/init.d/networking restart service pveproxy restart -
公司服务器主板是联想的,按 F1 进入boot 设置u 盘启动顺序(这部分较为容易,不再截图)
-
进入promox WEB 管理界面 内网地址: https://192.168.2.22:8006
-
在下图
ISO 镜像这里将ubuntu上传上去 -
在WEB 界面创建虚拟机,创建方法类似于 VMware ( 这里不再详述 )
参考教程:https://www.bilibili.com/video/BV1hh411S71J/?vd_source=c2d05182ffbc2da978ff445af107c7ef
-
-
安装
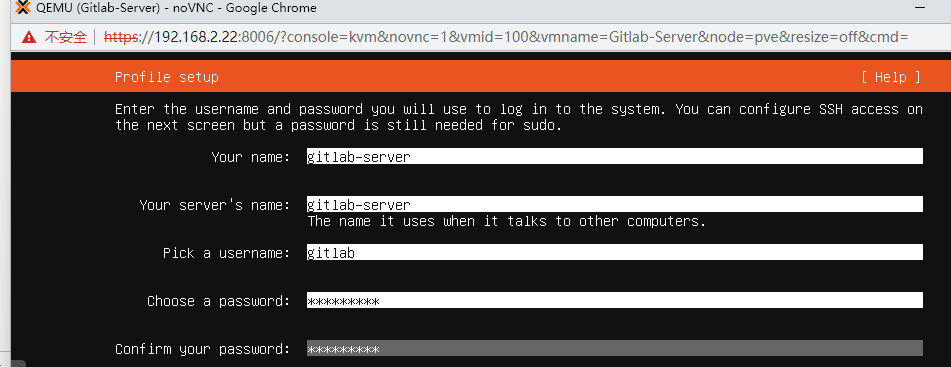
ubuntu服务器版本不再详述:
切记在updata 的时候需要手动在 promox WEB 界面重启 Ubuntu,否则要等很久。(应该是软件源的问题,连不上服务器)
ubuntu 基本配置
-
安装好ubuntu 之后先修改ssh 并允许root 登录连接
// 安装ssh(如果没安装) sudo apt-get install openssh-server // 查看ssh 状态 service ssh status // 如果没启动,启动一下 systemctl enable ssh systemctl enable sshd // 如果有ufw 就检查一下 sudo ufw allow ssh // 配置sshd_config sudo vim /etc/ssh/sshd_config /* 打开 port 22 允许密码登录 PasswordAuthentication yes 允许root用户名登录 PermitRootLogin yes */ //重启ssh systemctl restart sshd -
使用 Xshell 工具连接ubuntu ( 便于复制粘贴文本 )
-
更换软件源后执行:
sudo apt-get update//安装vim sudo apt-get install vim -y //进入etc/apt/sources.list 文件并修改软件源 为国内源 vim /etc/apt/sources.list #//复制粘贴下方阿里云源 deb http://mirrors.aliyun.com/ubuntu/ bionic main restricted universe multiverse deb http://mirrors.aliyun.com/ubuntu/ bionic-security main restricted universe multiverse deb http://mirrors.aliyun.com/ubuntu/ bionic-updates main restricted universe multiverse deb http://mirrors.aliyun.com/ubuntu/ bionic-backports main restricted universe multiverse ##測試版源 deb http://mirrors.aliyun.com/ubuntu/ bionic-proposed main restricted universe multiverse # 源碼 deb-src http://mirrors.aliyun.com/ubuntu/ bionic main restricted universe multiverse deb-src http://mirrors.aliyun.com/ubuntu/ bionic-security main restricted universe multiverse deb-src http://mirrors.aliyun.com/ubuntu/ bionic-updates main restricted universe multiverse deb-src http://mirrors.aliyun.com/ubuntu/ bionic-backports main restricted universe multiverse ##測試版源 deb-src http://mirrors.aliyun.com/ubuntu/ bionic-proposed main restricted universe multiverse
ubuntu 部署Gitlab 服务
-
安装 Nginx Passenger(管理工具)(暂不使用,因为目前使用gitlab 自带的nginx)- 准备工作
当依赖源报错时,首先考虑是软件源版本对不上,然后修改软件源
最终解决办法: 打开https://oss-binaries.phusionpassenger.com/apt/passenger 找到你对应的内核的代号,14.04--Trusty 16.04--Xenial 18.04--Bionic
https://releases.ubuntu.com/ 这里会有对应内核代号的// 密钥& 证书之类 sudo apt-key adv --keyserver hkp://keyserver.ubuntu.com:80 --recv-keys 561F9B9CAC40B2F7 sudo apt-get install -y apt-transport-https ca-certificates //添加新的源 -- 注意依赖问题 /*最终解决办法: 打开https://oss-binaries.phusionpassenger.com/apt/passenger 找到你对应的内核的代号, 14.04--Trusty 16.04--Xenial 18.04--Bionic https://releases.ubuntu.com/ 这里会有对应内核代号的 */ /* 我在Ubuntu 14.10上遇到了相同的问题 sudo nano /etc/apt/sources.list.d/passenger.list deb https://oss-binaries.phusionpassenger.com/apt/passenger trusty main */ // 直接执行下面这行代码 能匹配上 ubuntu-18.04.6-live-server-amd64.iso sudo sh -c 'echo deb https://oss-binaries.phusionpassenger.com/apt/passenger bionic main > /etc/apt/sources.list.d/passenger.list' sudo apt-get update -
安装
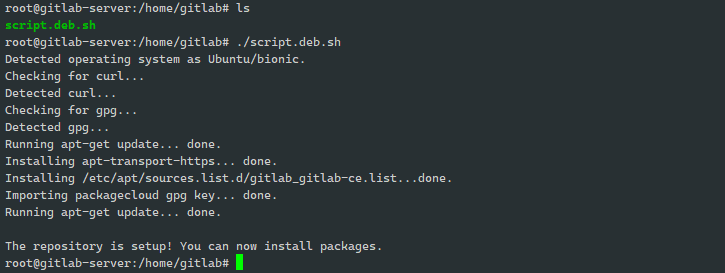
gitlab-ce- 获取安装脚本 script.deb.sh
- 赋予脚本权限 chmod 777 script.deb.sh
- 执行脚本
-
此时 source.list.d 文件夹下面会多出 gitlab-ce 的源,现在就可以 apt-get install gitlab-ce 了
-
之后可以删除脚本(随意,反正不占空间)
// 获取安装脚本
curl -LO https://packages.gitlab.com/install/repositories/gitlab/gitlab-ce/script.deb.sh

// 赋予脚本权限
chmod 777 script.deb.sh

// 执行脚本
./script.deb.sh

// 安装gitlab-ce
apt-get install gitlab-ce
思考与解决方案:
//1. 公网ip
IP地址:202.105.113.xx
子掩码:255.255.255.248
网关:202.105.113.xx

//2. 尽量节约IP 地址,
服务器接POE 口,  在promox 修改ip 地址和端口 比如监听xxxx ,在promox 服务上配置nginx 反向代理  (最后还是使用的NAT 代理,监听xxxx 端口代理至虚拟机的22端口,不使用nginx,因为会导致gitlab 访问页面有一个小BUG)

//  配置 promox NAT  端口转发。
在后面会有详细配置,请往后翻阅
在promox 设置网卡
解决办法网址:https://blog.e9china.net/share/proxmox-ve-setting-up-nat-port-forwarding.html#anchor
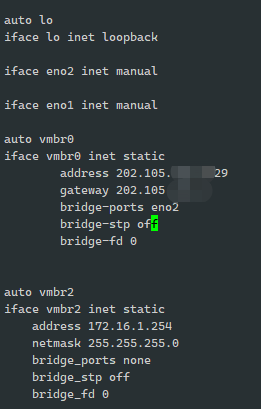
// 添加一块内网网卡
nano /etc/network/interfaces
/*
auto vmbr2
iface vmbr2 inet static
    address 172.16.1.254
    netmask 255.255.255.0
    bridge_ports none
    bridge_stp off
    bridge_fd 0
*/

// 设置NAT
vim /etc/sysctl.conf
#看看有没有这行,没增加。有被注释,取消注释!
net.ipv4.ip_forward=1
#让他立刻生效
/sbin/sysctl -p

!!! 在pve 界面要把新添加的网卡设置为桥接至虚拟局域网的网关(桥接相当于配置网关)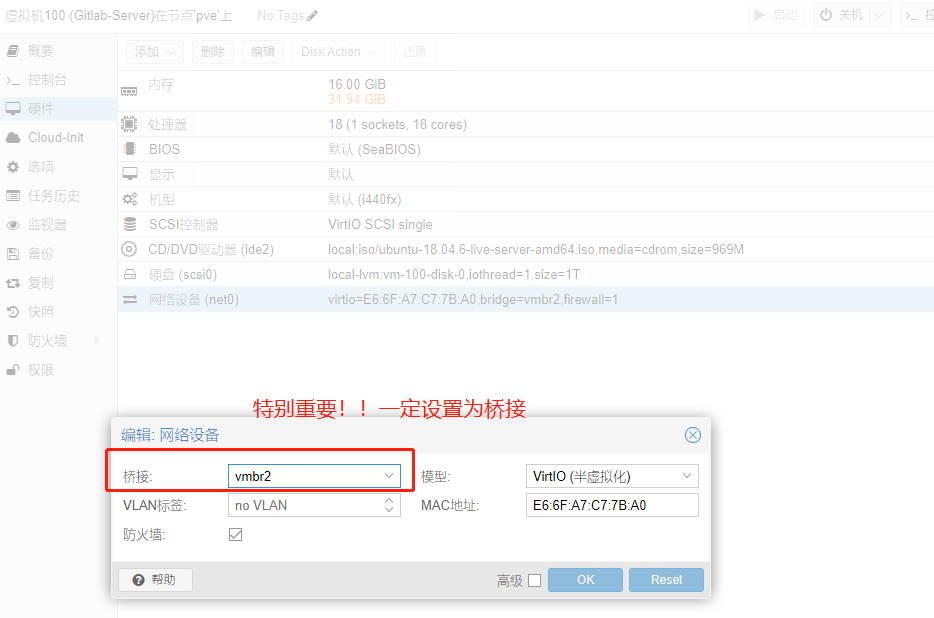
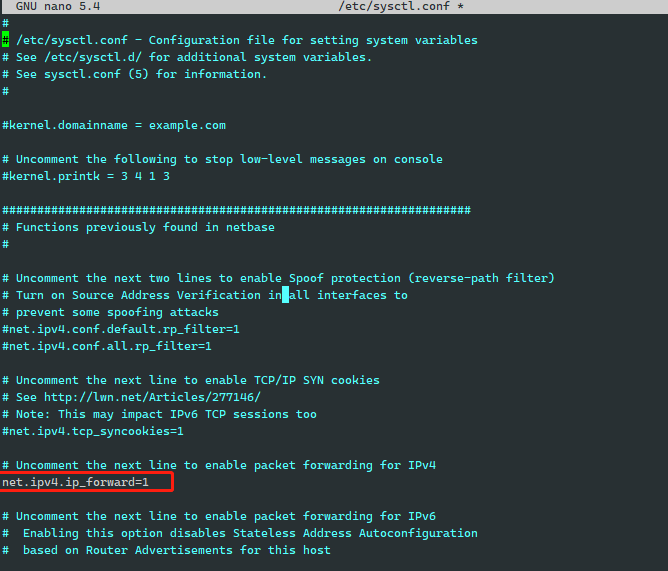
-
proxmox设置需要转发的端口
ssh 端口映射成6665
8006 端口就不转发,直接访问
8051 端口用于 gitlab 服务器 因此访问 http://url:8051
Gitlab 服务的内网地址 172.16.1.11 // 8051 是gitlab 主页。22是ssh 映射成6665
#10.21.21.0/24是2.2步骤里面你设置的ip段 //iptables -t nat -A PREROUTING -i vmbr0 -p tcp --dport 2222 -j DNAT --to 10.21.21.10:22 #vmbr0 为你的实体网卡,而不是vmbr2虚拟网卡,别搞错了! #10.21.21.6:22就是你要转发的vm端口 // 配置NAT 映射 将8051 作为域名访问gitlab 的入口。6665设置为调试ubuntu 的入口 iptables -t nat -A POSTROUTING -s '172.16.1.11/24' -o vmbr0 -j MASQUERADE iptables -t nat -A PREROUTING -i vmbr0 -p tcp --dport 8051 -j DNAT --to 172.16.1.11:8051 iptables -t nat -A PREROUTING -i vmbr0 -p tcp --dport 6665 -j DNAT --to 172.16.1.11:22 iptables -t nat -A PREROUTING -i vmbr0 -p tcp --dport 6666 -j DNAT --to 172.16.1.11:80 //proxmox更换国内源 !! 便于安装iptables https://www.cnblogs.com/HGNET/p/17124858.html //安装 安装iptables 工具 apt-get install iptables-persistent iptables-save > /etc/iptables/rules.v4 iptables-restore < /etc/iptables/rules.v4 // 创建文件 touch /etc/network/if-pre-up.d/iptables // 添加执行权限 chmod +x /etc/network/if-pre-up.d/iptables // 文件中添加内容 vi /etc/network/if-pre-up.d/iptables /* #!/bin/sh /sbin/iptables-restore < /etc/iptables/rules.v4 */ // 重启网卡,即可使用 如果不行,就重启服务器( pve 的特性 ) service networking restart /* 这样设置后,每次开机会从/etc/iptables读取iptables设置。修改iptables规则后,执行iptables-save > /etc/iptables这个命令就会把设置好的iptables规则保存到/etc/iptables这个文件。这样就不怕重启后丢失iptables设置了。 */ -
修改Ubuntu IP地址 、pve 的DNS
// 参考地址 https://cloud.tencent.com/developer/article/1711887 // 修改ip地址 cd /etc/netplan vim 00-installer-config.yaml // 修改pve的DNS (ubuntu 也适用,但ubuntu没必要改) vim /etc/resolv.conf /* serarch lan namerserver 223.5.5.5 */ // ubuntu 修改DNS 地址参考文档 https://www.laozuo.org/25628.html -
ubuntu下gitlab 添加SSL 证书,使用https 访问。
root@gitlab:/etc/gitlab/ssl# ls gitlab.xxxx.xxx.key gitlab.xxxx.xxx.pem // 修改权限 chmod 440 gitlab.xxxx.xxx.pem chmod 600 gitlab.xxxx.xxx.key // 修改链接为https、配置ssl 证书的地址 // 修改/etc/gitlab/gitlab.rb 的url 链接和密钥之类 下方公钥后缀名可以是pem external_url 'https://url:8051' nginx['ssl_certificate'] = "/etc/gitlab/ssl/your-certificate.crt" nginx['ssl_certificate_key'] = "/etc/gitlab/ssl/your-private-key.key" // 重启服务 gitlab-ctl reconfigure /***************** gitlab 用ssh 方式clone 输入密码解决办法 **************************/ // 修改/etc/gitlab/gitlab.rb 的ssh 端口 /* 因为我们使用了端口映射,如果使用默认端口, git 工具还以为是和内部pve 的ssh 链接, 因此提示要输入密码。 */ gitlab_rails['gitlab_shell_ssh_port'] = 2222 // 如果有防火墙,请打开防火墙端口( 我这里目前没有配置防火墙 ) sudo ufw allow 2222/tcp -
修改gitlab 仓库的地址
// 创建目标仓库的位置
mkdir -p /data/gitlab
mkdir -p /data/gitlab-backup

// 将它分配给git 用户
chown -R git.git /data/gitlab
chown -R git.git /data/gitlab-backup

// 修改 /etc/gitlab/gitlab.rb   的配置文件
vim /etc/gitlab/gitlab.rb
/*
gitlab_rails['backup_path'] = "/data/gitlab-backups"
git_data_dirs({
      "default" => {
              "path" => "/data/gitlab"
      }
})
*/

// 如果拉取代码 (或者仓库找不到提示如下)
/*
remote: rpc error: code = NotFound desc = GetRepoPath: not a git repository: "/data/gitlab/repositories/@hashed/6b/86/6b86b273ff34fce19d6b804eff5a3f5747ada4eaa22f1d49c01e52ddb7875b4b.git"
*/
这里就是用户权限的问题,解决办法如下
chown -R git.git /data/gitlab/repositories/@hashed

再次使用ls -l 查看用户组的权限问题,将它分配给git 用户(完美解决)
/*
root@my_gitlab:/data# ll -l
total 16
drwxr-xr-x  4 root root 4096 Jun  9 06:08 ./
drwxr-xr-x 26 root root 4096 Jun  9 06:06 ../
drwx------  3 git  git  4096 Jun  9 06:35 gitlab/
drwx------  2 git  git  4096 Jun  9 06:08 gitlab-backups/
*/
相关配置
-
在proxmox 中添加温度显示 参考地址
// js 格式参数,不可照搬参考文档的,应该用如下参数 { itemId: 'sensinfo', colspan: 2, printBar: false, title: gettext('温度传感器'), // WEB显示内容 textField: 'sensinfo', renderer:function(value){ value = JSON.parse(value.replaceAll('Â', '')); const c0 = value['coretemp-isa-0000']['Core 0']['temp2_input'].toFixed(1); const c1 = value['coretemp-isa-0000']['Core 1']['temp3_input'].toFixed(1); const c2 = value['coretemp-isa-0000']['Core 2']['temp4_input'].toFixed(1); const c3 = value['coretemp-isa-0000']['Core 3']['temp5_input'].toFixed(1); //const f1 = value['it8786-isa-0a40']['fan1']['fan1_input'].toFixed(1); // returnCPU核心温度: ${c0}℃ | ${c1}℃ | ${c2}℃ | ${c3}℃ <br> 风扇转速:${f1}; // 输出格式 returnCPU核心温度: ${c0}℃ | ${c1}℃ | ${c2}℃ | ${c3}℃; // 输出格式 } }, -
设置登录 proxmox 不再提醒未订阅 之后浏览器 Ctrl + F5 清除缓存并刷新
// 在proxmox 中修改proxmoxlib.js 文件 cd /usr/share/javascript/proxmox-widget-toolkit // 做好备份, cp cp proxmoxlib.js proxmoxlib.js.bak // 修改文件 vim proxmoxlib.js /* 找到下方这个判断语句, 直接把判断条件改为 false if (res === null || res === undefined || !res || res .data.status.toLowerCase() !== 'active') { */ 改为: if (false) { -
提示CI/CD 部分提示错误信息
-
在gitlab.rb 开启信息提示
# 在/etc/gitlab/gitlab.rb 中添加一行配置信息 registry_external_url 'http://202.105.xxx.x:8266' -
做了第一步之后,报错信息就更改为
-
-
iptables 删掉特定路由
// 查找路由 iptables -t nat -L -n --line-numbers // 添加路由 iptables -t nat -A POSTROUTING -s '10.10.10.11/24' -o vmbr0 -j MASQUERADE iptables -t nat -A PREROUTING -i vmbr0 -p tcp --dport 3000 -j DNAT --to 10.10.10.11:22 // 删掉路由 ( PREROUTING 可以改为POSTROUTING 之类的, 最后一位跟的是编号) iptables -t nat -D PREROUTING 6 -
安全加固 fail2ban 限制登录失败次数
sudo apt-get udpate
apt-get install fail2ban

# 复间conf 复制成local
sudo cp /etc/fail2ban/jail.{conf,local}

# 查看 ssh 服务被ban 的ip 地址
fail2ban-client status sshd

# 解除该IP 的限制
sudo fail2ban-client set sshd unbanip 23.34.45.56

# 在 /etc/fail2ban/jail.local 中修改参数
[sshd]
enabled   = true
port    = 65533
logpath = %(sshd_log)s
backend = %(sshd_backend)s

# 每次修改完记得重启
systemctl restart fail2ban
加固proxmox 自定义过滤器的防护
# 在 /etc/fail2ban/jail.local 中添加服务 [proxmox] enabled = true port = 8006 filter = proxmox logpath = /var/log/daemon.log maxretry = 6 findtime = 600 bantime = 3600 # 设置 过滤规则 proxmox ## 在/etc/fail2ban/filter.d/ 中创建 proxmox.conf 文件 vim /etc/fail2ban/filter.d/proxmox.conf ## 添加规则 [Definition] failregex = pvedaemon\[.*authentication failure; rhost=user=.* msg=.* ignoreregex = ## 解释:在proxmox 的日志中找到匹配authentication failure 的字段,并得到它的IP 地址,然后让这个IP坐牢jail # 重新启动服务 让它生效 systemctl restart fail2ban
登录信息
-
服务器promox地址:https://url:8006 账号: root 密码:?
-
ubuntu 地址:172.16.1.11 DNS 服务器使用223.5.5.5 (阿里云DNS)
-
登录名称 gitlab 密码 ? ,root 权限密码 ? (不可直接使用root 登录)
- 查看端口占用命令 netstat -ntlp


